Internal
Specifications
Floor Plan
Plumbing
Electrical
Internal
External
Costs

The internal work on the bus was broken into sections. The initial task was to remove the seats to see what area we had to work with before committing to a floor plan.

The seats were relatively easy to remove since the seat bases came out it gave easy access to the bolts which were not rusted or damaged. The main obstacle was the abundance of chewing gum and general "gunk" under the seats. Once the seats were removed it gave us a clearer picture of possible layouts. We are keeping the best seats for both traveling and for our table eating area. The seat from the drivers side fitted perfectly on the door side when facing the rear.

We also discovered that a few repairs were necessary before any main tasks could be started. 
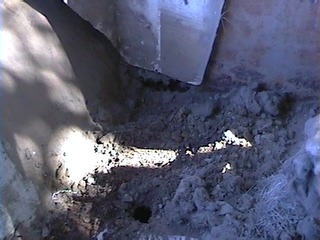
The main fault was rust in the rear near side corner. Water had been entering via the rear side window as well as the from the roof via the air intake. Damage was confined to a relatively small area under the rear seat and on the side window framework.

The rust was not difficult to cut out with an angle grinder but I hadn't realized the difficulty involved in finding similar sized steel with which to replace it. In the end I had to settle with one larger and one smaller size to achieve the desired result. All areas were then painted with rust preventative paint.

Damaged and rusted material was taken out and repaired under the floor area above the rear passenger side wheels. To do this the rear floor was lifted and whilst we had access other repairs and modifications were made such as adjusting the battery stowage, repairing a broken air tank holding strap and fixing the air tank moisture drain. The rear chassis was also given a good pressure clean and the paint work touched up as necessary.

The two rear windows on both sides were removed and it was pleasing to find rust problems in only one area as mentioned above. The bus is not under cover and the temporary plastic covers were not very reliable on wet windy days. The arrival of the new windows was a long wait so that the bus could be sealed from the elements.

The bus, once stripped of all its internal components required many more hours of rivet removal. Almost all fittings were riveted, a few screwed and some glued. It was easy to remove the rivet heads to take the fitting off but later the remains of the rivet had to be extracted. This was done using a drill and/or a hammer and sharp wood chisel.

The carpet was painful. It was a loop style carpet that was heavily glued. When trying to pull it off it would simply tear and thread itself rather than come off in a sheet. A variety of methods were attempted but eventually my wife persisted using a borrowed paint stripping heat gun, an egg flip spatula, her hands, a large amount of elbow grease and stubborn determination to pull it off.

The internal fitout began with the lining of the ceiling. We used craftwood sheeting and then varnished it. We placed the lights into position as we went. A section of the old overhead parcel rack was then refitted and used for a neat entry point for the electrics from the ceiling to the circuit panels situated on the front of the rack. The electrician then completed his work before the floor covering was laid by a carpet/vinyl layer. He also glued new carpet to selected areas of the ceiling.

The construction of the walls, beds as well as the installation of the TV, fridge and the bolting in of the seats was undertaken. This was the good bit as we could see it taking shape as a motorhome and no longer just a construction site.