|
|
|
|
|
|
|
|
|
|
|
|
|
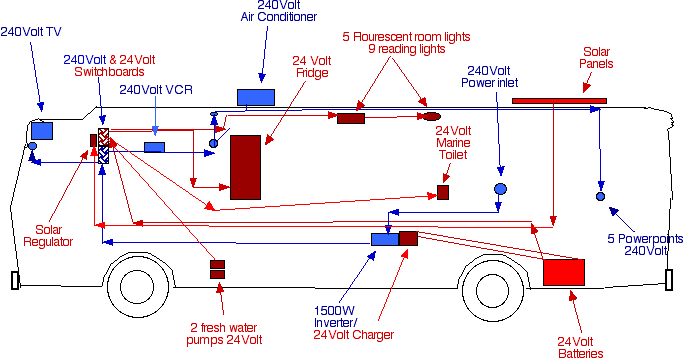
The Electrics on the bus have been without doubt our most time consuming area. As is the norm we first worked out our power needs by deciding on the electrical items we intended to use and calculated our daily power consumption. We then sought to purchase the necessary items which was not overly difficult except of course coming up with the funds to pay for them. A problem encountered was locating the items in our required spot and then working out how to get power to them without causing too much pain in the process. All 24 volt cables have rubber grommets where they pass through a beam and all 240 volt cables are grommeted or wherever possible are enclosed within conduit. The 24 volt wiring was done by myself whereas the 240 volt power was completed by a licensed electrician. Below is a diagram of the electrics with all main items mentioned and roughly positioned in their respective locations. The 5 fluorescent lights are positioned - above the table, in the kitchen, bathroom, children's bedroom and parent's bedroom. The reading lamps - one each for the three single beds, two for the double bed and one each above the four double seats. The 240 volt power points - a double for the VCR,one for the TV, one for the kitchen area, one at the table and one in the parent's bedroom. |

|
Our appliances are, I imagine, typical of most motor homes with the exception of perhaps the children's Nintendo computer game console. We have tried to limit the number of electrical appliances to only those necessary or those that we couldn't conceivably live without. We especially limited the number of kitchen items to a minimum. Time well tell if this is satisfactory. |
|
|
|
|
|
|
Digitor 10 inch colour TV |
240 Volts |
60 Watts |
.25 Amps |
|
Samsung Video |
240 Volts |
17 Watts |
.08 Amps |
|
JVC Video Camera/Charger |
240 Volts |
23 Watts |
.1 Amps |
|
Apple Laptop Computer/Charger |
240 Volts |
45 Watts |
.19 Amps |
|
Nintendo 64 Games Console |
240 Volts |
26 Watt |
.11 Amps |
|
Ryobi 12 Volt Cordless Drill/Charger |
240 Volts |
37.5 Watts |
.15 Amps |
|
Phillips Mobile Phone/Charger |
240 Volts |
5.6 Watts |
.02 Amps |
|
Wren Air Conditioner |
240 Volts |
1560 Watts |
6.5 Amps |
|
Total |
7.4 Amps |
|
Fluorescent Lights x 5 |
24 Volt |
16 Watt x 5 |
.67 x 5 = 3.35 Amps |
|
Reading Lights x 9 |
24 Volt |
8 Watts x 9 |
.33 x 9 = 2.97 Amps |
|
Waeco Coolmatic Fridge |
24 Volt |
70 Watts |
2.91 Amps |
|
Water Pump |
24 Volt |
96 Watts |
4 Amps |
|
Total |
13.23 Amps |
|
To power all our appliances we needed to make a few decisions such as the voltage used for lights etc, whether to use a 240 volt domestic fridge via an inverter or use a 12/24 volt fridge? What would we use to maintain battery levels and of course how much can we afford to spend? As our bus was already on 24 volts we decided to continue this through the bus for our lights and fridge and use an inverter to run our 240 volt appliances. The system starts at the Eight (8), 6 Volt, 220 Amp hour batteries arranged in 2 banks of 4, connected in series producing the required 24 Volts. This was then wired via twin-flex 6 mm wire to a switch box containing fuses before distribution to the lights and fridge. The batteries were also connected via battery cables to a Trace 1524 Inverter/charger which in turn was cabled to a circuit box using 1.5 mm domestic electrical wiring enclosed in 25 mm conduit. The switch box has circuit breakers for each of the 2 circuits. These are for the air conditioner and for the power points. If we are connected to a 240 volt power source the Trace inverter senses this and automatically switches to this supply and starts up its internal battery charger to top up our batteries. The batteries are also topped up via 2 Unisolar 64 Watt solar panels regulated by a PL20 solar regulator which is wired into the load side of the 24 volt system. This gives a record of power usage on the PL20 LED display. |